Chamberlain B4505T Installation: A Comprehensive Guide
Welcome! This detailed guide provides clear, step-by-step instructions for a successful Chamberlain B4505T garage door opener installation, ensuring optimal performance.
Understanding the Manual’s Scope
This manual is specifically designed to guide you through the installation process of the Chamberlain B4505T garage door opener. It covers everything from initial preparation and safety precautions to the final programming and testing stages.
We’ve focused on providing clear, concise instructions accompanied by illustrative diagrams to ensure a smooth and understandable experience, even for those with limited DIY experience.
However, please note that this manual assumes a basic understanding of common tools and electrical safety practices. If you are uncomfortable working with electricity or have any doubts about your ability to safely complete the installation, we strongly recommend consulting a qualified professional.
This guide does not cover modifications to the opener or compatibility with non-Chamberlain components. Always refer to the official Chamberlain website for the most up-to-date information and support.

Before You Begin: Safety First
Crucially, disconnect power before starting! Wear safety glasses and gloves; a second person assists with lifting heavy components for safe installation.
Essential Tools Required
For a smooth installation of your Chamberlain B4505T garage door opener, gathering the correct tools beforehand is paramount. You will need a Phillips head screwdriver – both standard and stubby versions are helpful for tight spaces. A 9/16” socket wrench, along with an extension, is crucial for securing bolts.
A level is essential for ensuring proper alignment of the rail and motor unit. Pliers, both standard and needle-nose, will assist with wire connections. Don’t forget a wire stripper/cutter for precise electrical work. A drill with various bits (including a masonry bit if mounting to concrete) will be necessary.
Measuring tape, a hammer, safety glasses, work gloves, and a ladder are also vital. Finally, a voltage tester is absolutely critical for confirming power is disconnected before any electrical connections are made, prioritizing your safety throughout the process.
Checking Package Contents
Before commencing the Chamberlain B4505T installation, carefully unpack the box and verify all components are present. You should find the motor unit itself, the rail assembly (typically in multiple sections), a door bracket, and safety sensors.
Locate the remote controls – usually two are included – and the wall control panel. Ensure you have the mounting hardware pack, containing bolts, nuts, washers, and screws of various sizes. The manual and chain are also essential.
A quick visual inspection should confirm the presence of the operator chain, the emergency release cord, and any included hardware for attaching the door to the opener. Important: If any parts are missing or damaged, immediately contact Chamberlain customer support for replacements before proceeding with the installation. A complete inventory prevents delays.

Step-by-Step Installation Process
Follow these instructions carefully to assemble and install your Chamberlain B4505T garage door opener, ensuring a secure and functional system is achieved.
Mounting the Rail Assembly
Begin by securely attaching the rail sections together, ensuring proper alignment for smooth operation. Utilize the provided hardware – bolts, nuts, and washers – tightening them firmly but avoiding over-tightening, which could damage the components;
Position the assembled rail within your garage, carefully considering the headroom requirements and door travel path. Attach the rail to the ceiling joists using sturdy mounting brackets, verifying they are securely fastened to withstand the opener’s weight and movement.
Double-check the rail’s levelness; an uneven rail can cause operational issues. Use shims if necessary to achieve a perfectly horizontal position. Proper rail mounting is crucial for a stable and reliable garage door opener system, preventing vibrations and ensuring longevity.
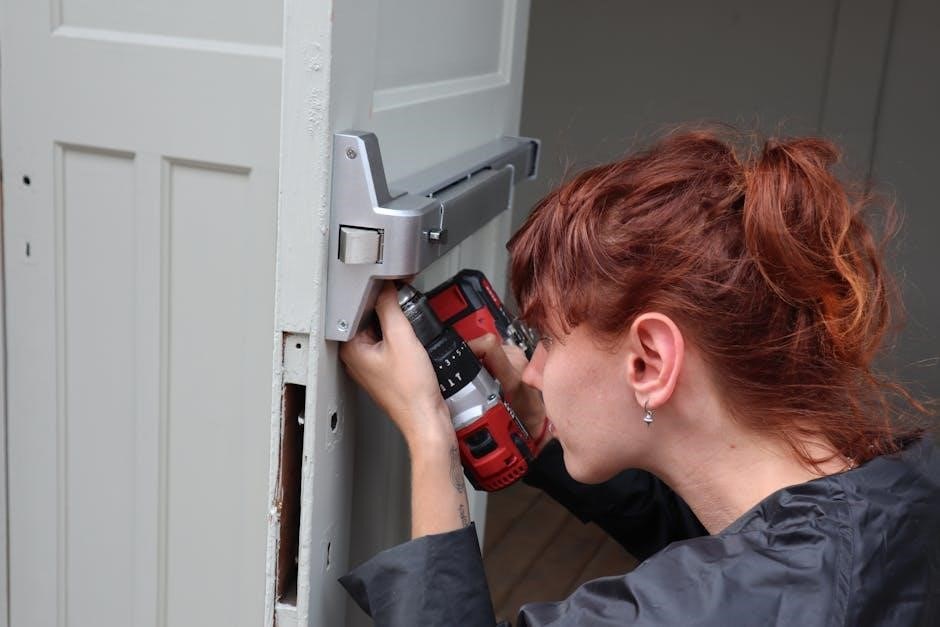
Attaching the Motor Unit
Carefully lift the motor unit and align it with the mounted rail assembly. Slide the motor unit onto the rail, ensuring it engages fully and securely with the carrier. You should hear a distinct click, confirming proper connection.
Secure the motor unit to the rail using the designated bolts and washers, tightening them to the manufacturer’s specified torque. Avoid excessive force, as this could strip the threads or damage the unit’s housing.
Verify the motor unit is firmly attached and doesn’t exhibit any wobble or instability. A secure attachment is vital for safe and efficient operation, preventing potential disconnections during use. Double-check all connections before proceeding to the next installation step.
Connecting the Door Bracket
Locate the pre-drilled holes on your garage door panel, typically near the center. Attach the curved door bracket using the provided lag screws and washers, ensuring a flush and secure fit against the door’s surface.
Important: Use the correct size drill bit for pilot holes to prevent splitting the wood. Tighten the lag screws firmly, but avoid over-tightening, which could damage the door.
Connect the arm from the motor unit to the door bracket using the provided connecting hardware – usually a clevis pin and clip. Ensure the arm is positioned correctly for smooth door operation. Verify the bracket is securely fastened and the arm moves freely without binding. This connection is crucial for transferring power and controlling the door’s movement.

Wiring and Electrical Connections
Caution! Proper electrical connections are vital for safe operation; always disconnect power before starting and follow all local electrical codes carefully.
Power Supply Considerations
Voltage Requirements: The Chamberlain B4505T operates on a standard 120V, 60Hz electrical supply; Ensure your garage has a properly grounded outlet meeting these specifications; Do not attempt to connect the opener to a different voltage, as this could cause serious damage or create a fire hazard.
Dedicated Circuit: It is highly recommended to use a dedicated 15-amp circuit for the garage door opener. Sharing a circuit with other appliances can lead to tripped breakers, especially during opener operation. A dedicated circuit ensures reliable performance.
Extension Cord Usage: Avoid using extension cords whenever possible. If absolutely necessary, use a heavy-duty, 14-gauge or larger extension cord rated for outdoor use and keep it as short as possible to minimize voltage drop. Never use a lighter gauge cord.
GFCI Protection: Consider installing a Ground Fault Circuit Interrupter (GFCI) outlet for added safety, particularly in damp or humid garage environments. This will protect against electrical shock.
Photo Eye Sensor Installation
Safety First: The photo eye sensors are crucial for preventing the door from closing on obstructions. Locate the sensor brackets on the door tracks, typically 6-12 inches above the floor. Ensure they are aligned and facing each other.
Wiring: Connect the sensor wires to the motor unit’s designated terminals, paying close attention to the color coding. Typically, black to black and white to white. Incorrect wiring will prevent the safety system from functioning correctly.
Alignment: After wiring, align the sensors so the indicator lights are solid. If blinking, adjust the sensor positions until a solid light is achieved on both sides. This confirms the infrared beam is uninterrupted.
Testing: Test the system by placing an object in the door’s path while closing. The door should immediately stop and reverse. Never bypass or disable the photo eye sensors.
Limit Switch Adjustment
Crucial Calibration: Limit switches define the fully open and fully closed positions of your garage door. Incorrect adjustment can lead to excessive strain on the opener or incomplete door travel.
Adjustment Screws: Locate the adjustment screws on the motor unit, typically labeled “Up” and “Down.” These control the travel limits. Begin with the ‘Down’ limit, adjusting until the door fully closes and stops.
Fine-Tuning: Next, adjust the ‘Up’ limit screw. Slowly increase the setting until the door reaches its fully open position. Avoid over-tightening, as this can damage the mechanism.
Testing & Refinement: Test the limits by manually operating the door several times. Make small adjustments as needed to ensure smooth, complete travel. Refer to the manual’s diagrams for screw locations.

Remote Control Programming
Effortless Control: This section details programming your Chamberlain B4505T remotes for convenient garage door operation, enhancing security and accessibility for all users.
Initial Remote Programming
First-Time Setup: To program your Chamberlain B4505T remote for the very first time, locate the “Learn” button on the motor unit. This button is typically yellow or orange and is found on the back or side of the opener. Press and release the “Learn” button – the indicator light will illuminate, signaling the opener is in programming mode.
Within 30 seconds, press and hold the desired button on your remote control until the garage door opener light blinks, or you hear a click. This indicates successful programming. If the light doesn’t blink or the door doesn’t respond, repeat the process. Remember, each button on the remote can be programmed to operate a different opener if you have multiple.
Test the remote by pressing the programmed button. If the door operates correctly, the programming is complete!
Adding Additional Remotes
Expanding Your Access: Adding extra remotes to your Chamberlain B4505T system is straightforward. Begin by ensuring the existing remotes are functioning correctly. Locate the “Learn” button on the garage door opener motor unit, usually yellow or orange. Press and release this button to activate programming mode – the indicator light will illuminate.
Within 30 seconds, press and hold the button on the new remote you wish to program until the garage door opener light blinks or you hear a click. This confirms successful synchronization. Repeat this process for each additional remote you want to add.
Always test each newly programmed remote to verify operation. If a remote fails to program, try again, ensuring a clear line of sight between the remote and the motor unit.
Troubleshooting Remote Issues
Remote Not Working? Several factors can cause remote control problems. First, check the battery – a weak battery is the most common culprit. Replace it with a fresh one, ensuring correct polarity. If the battery is good, verify the remote is programmed correctly by repeating the programming steps.
Obstructions between the remote and the garage door opener can also interfere with the signal. Try operating the remote from a closer distance. Interference from other devices, like certain types of lighting, can sometimes cause issues; try turning off potential sources of interference.
If problems persist, re-program the remote, and if still unsuccessful, consult the full manual or Chamberlain support.

Fine-Tuning and Adjustments
Precise adjustments are crucial for smooth, safe operation. Carefully configure door limits, force settings, and the safety reversal system for optimal performance.
Door Travel Limit Settings
Adjusting the travel limits dictates how far the door opens and closes. Incorrect settings can lead to incomplete cycles or the door hitting obstructions. Begin by loosening the adjustment screws located on the motor unit’s limit dials.
Slowly rotate the dials, observing the door’s movement during each adjustment. For the ‘open’ limit, incrementally increase the setting until the door reaches its fully open position – but doesn’t strain. For the ‘close’ limit, adjust until the door is fully closed and securely rests on the bottom seal.
Important: After each adjustment, cycle the door fully to verify the settings. Fine-tune as needed. Over-adjustment can damage the door or opener, so proceed cautiously. Securely tighten the adjustment screws once the desired limits are achieved. Refer to the diagrams in the manual for screw locations.
Force Adjustment
Force settings determine the power applied to overcome door resistance – like wind or slight binding. Incorrect force settings can compromise safety! Locate the force adjustment dials on the motor unit; typically, there are separate adjustments for up and down travel.
Start with the lowest force setting and incrementally increase it until the door operates smoothly through its full range of motion. Avoid excessive force, as this can damage the door or opener, and disable the safety features.
Caution: Regularly test the safety reversal system after any force adjustment. The door should immediately reverse upon encountering an obstruction. If it doesn’t, reduce the force setting. Consult the manual’s diagrams for dial locations and recommended starting points.
Safety Reversal System Check
Crucially important! The safety reversal system prevents the door from closing on obstructions. Testing ensures proper function and protects people and property. Place a 2×4 piece of wood flat on the door’s path.
Activate the door’s downward travel. The door must immediately stop and reverse direction upon contacting the wood. Repeat this test in several locations along the door’s width.
If the door fails to reverse, immediately discontinue use and revisit the force adjustment settings (reduce the force). Also, verify the photo eye sensors are correctly aligned and unobstructed. A malfunctioning safety system renders the opener unsafe; do not operate until resolved. Refer to the troubleshooting section for further assistance.

Troubleshooting Common Problems
Encountering issues? This section details solutions for frequently experienced problems with your Chamberlain B4505T garage door opener, restoring functionality quickly.
Opener Not Responding
Problem: The garage door opener fails to activate when using the remote, wall button, or keypad. This is often the most frustrating issue for new users.
Possible Causes: First, verify the power supply. Check the circuit breaker dedicated to the opener and ensure it hasn’t tripped. Confirm the opener is properly plugged into a functioning outlet. Next, examine the battery in the remote control; a weak battery is a common culprit. Also, inspect the antenna wire connected to the motor unit – ensure it’s not damaged or disconnected.
Troubleshooting Steps: Reset the opener by disconnecting power for 30 seconds, then reconnecting. Test the wall button; if it works, the issue likely lies with the remote. If neither works, consult the wiring diagrams to confirm all connections are secure. If problems persist, a professional assessment may be necessary to diagnose potential motor or logic board failures.
Door Stops Mid-Travel
Problem: The garage door begins to close or open but halts before reaching the fully closed or open position. This indicates a disruption in the travel limits or a potential obstruction.
Possible Causes: Incorrectly adjusted travel limits are a primary suspect. The opener may be sensing an obstruction where none exists, triggering the safety features. Physical obstructions in the door’s path – even small items – can also cause this. A binding door, due to worn rollers or hinges, can create resistance and halt movement.
Troubleshooting Steps: Carefully inspect the door’s path for any obstructions. Re-adjust the up and down travel limits following the instructions in the ‘Fine-Tuning and Adjustments’ section. Lubricate the door’s rollers and hinges. If the issue persists, check the safety sensors to ensure they are aligned and free from debris, as a misaligned sensor can falsely detect an obstruction.
Remote Control Range Issues
Problem: The remote control operates effectively when close to the garage door opener but loses functionality at a distance. This diminished range can be frustrating and inconvenient.
Possible Causes: Weak battery power within the remote is a common culprit. Interference from other radio frequencies, such as those emitted by other electronic devices, can disrupt the signal. Obstructions like walls, vehicles, or dense foliage can weaken the radio signal. The antenna on the motor unit might be damaged or improperly positioned.
Troubleshooting Steps: Replace the batteries in the remote control with fresh ones. Try operating the remote from different locations to identify potential interference sources. Ensure the motor unit’s antenna is securely attached and extended. Reprogram the remote following the instructions in the ‘Remote Control Programming’ section. If problems continue, consider relocating the antenna.

Maintenance and Care
Regular upkeep is crucial for longevity! Consistent inspection and simple maintenance procedures will ensure smooth, reliable operation of your Chamberlain B4505T.
Regular Lubrication
Maintaining proper lubrication is paramount for the smooth and quiet operation of your Chamberlain B4505T garage door opener. Annually, or more frequently with heavy use, apply a lithium-based grease to the moving parts of the rail system. Specifically, focus on the rollers where the rail sections connect, ensuring full coverage for reduced friction.
The motor gear and chain (if applicable) also require lubrication. Avoid using oil-based lubricants, as they can attract dust and grime, ultimately hindering performance. Inspect the door hinges and rollers – these should be lubricated separately with a silicone-based spray lubricant. Never lubricate the door tracks themselves, as this can cause the rollers to stick. Always wipe away any excess lubricant to prevent buildup and maintain a clean operating environment. Proper lubrication extends the lifespan of your opener and minimizes noise.
Inspecting Rail and Hardware
Regularly inspect the entire rail assembly for any signs of damage, such as bends, cracks, or loose connections. Tighten any loose bolts or screws immediately to maintain structural integrity and prevent unwanted vibrations. Examine the rail joints for wear and tear, and replace any damaged sections promptly.
Pay close attention to the hardware connecting the door to the opener, including the door bracket and arm. Ensure these components are securely fastened and free from rust or corrosion. Check the chain or belt (depending on your model) for proper tension and wear. Look for frayed cables or damaged links. Do not operate the opener if any hardware appears compromised; address issues before further use to avoid potential safety hazards or malfunctions.
Safety Sensor Cleaning
Maintaining clear safety sensors is crucial for preventing accidental door closures and ensuring safe operation. Regularly inspect the sensors (located near the door opening) for dirt, dust, cobwebs, or debris. Use a soft, dry cloth to gently wipe the lens of each sensor. Avoid using any liquids, cleaners, or abrasive materials, as these can damage the sensors.
Ensure the sensors are aligned correctly; a misaligned sensor will interfere with the safety system. If the sensors are consistently dirty, consider relocating them to a cleaner environment. Test the safety reversal system after cleaning to confirm proper functionality. A properly functioning safety system is paramount for protecting people and property. Never bypass or disable the safety sensors.

Warranty Information and Support
Your Chamberlain B4505T garage door opener is backed by a comprehensive warranty, protecting against defects in materials and workmanship. Please retain your proof of purchase for warranty claims. The motor unit typically carries a longer warranty period than components like the remote controls and accessories. Detailed warranty information, including specific durations and exclusions, can be found in the separate warranty document included with your product.
For technical support, troubleshooting assistance, or to register your product, visit the Chamberlain website at www.chamberlain.com or call their customer support line at 1-800-684-0224. Chamberlain offers a wealth of online resources, including FAQs, videos, and manuals.